Traffic signal controller setup and workflows
Setting up a traffic signal controller in PTV Vistro for analysis is easy. Why? Our modern interface optimizes the daily tasks of traffic operation engineers and planners. Vistro’s powerful traffic signal workflow features make for an unparalleled experience. Moreover, your traffic signal controller setup is verified visually with the sequence and phase diagrams and signal group arrows in the network editor. Also, PTV Vistro traffic signal controllers are exportable to PTV Vissim and Visum to streamline the setup of advanced simulation models. The following tutorial provides you with essential knowledge in designing your first signal and understanding PTV Vistro's traffic signal controller software functionality.
Creating your first traffic signal controller
Global settings
PTV Vistro’s intuitive workflow helps you create your first controller. Of course, you can jump right in and start your first signal, but when creating multiple controllers, visiting Global Settings is a time saver. Under the edit menu, global settings set your default local agency or site parameters like lead/lag, cycle length, offset reference, pedestrian walk time and speed, vehicle interval durations, and NEMA phase orientations. Also, setting your preferred Major Flow Direction is a key step each time you start modeling a new corridor.
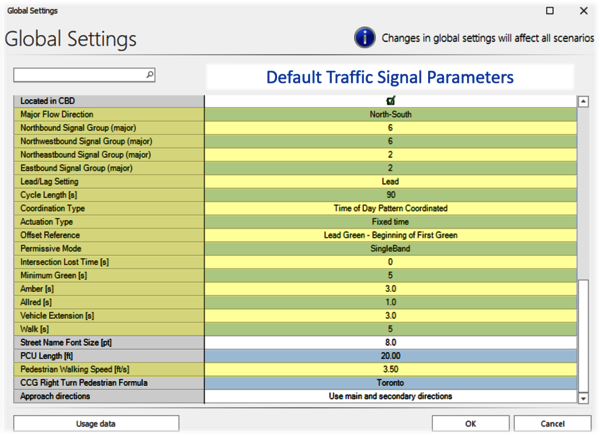
Global setting parameters for traffic signal controllers
Inserting a signalized intersection
Next, a signalized intersection is needed. Select the preset Signalized junction type from the toolbox and place it on the background map. Also, simply right-clicking on the background map and selecting Insert Intersection -> Signalized works. Moreover, Control Type in the Traffic Control workflow will update an intersection to Signalized at any time.
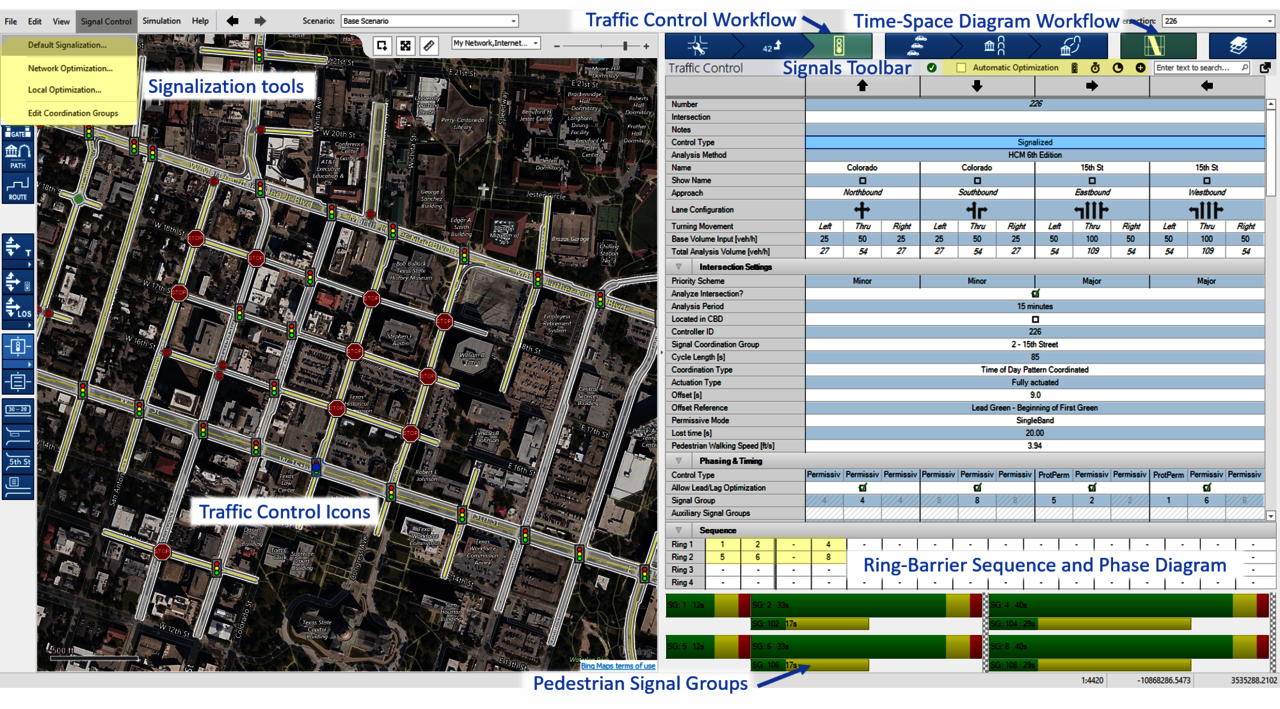
Traffic Control Workflow
Next, the Intersection Settings section in the Traffic Control workflow lists important settings for your traffic signal controller. Verifying the Priority Scheme’s Major and Minor flow and the coordination and actuation methods before Default Signalization is recommended. The explanation of these methods is often in the traffic signal controller printouts or plans.
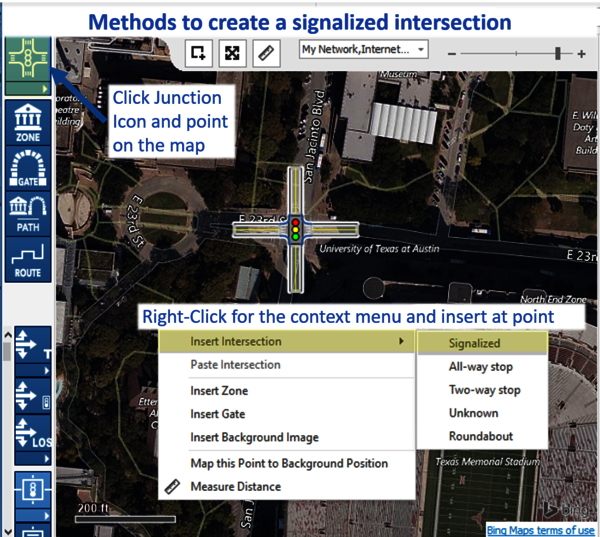
Drop a signalized intersection directly on the Bing base map to create your traffic signal controller.
Coordination method
First, set the traffic signal controller’s coordination type. This determines if the controller is free-running or part of a time-of-day (TOD) plan. The following describes coordination methods:
- Free-running means that the traffic signal controller does not have a set cycle length and is running with fully actuated detection.
- Time-of-day Coordinated sets a cycle length and places the controller in coordination with other signals in the same coordination group.
- Time-of-day isolated sets a cycle length but does not place the controller in coordination with other signals.
Actuation method
Next, setting the Actuation Type determines if the traffic signal controller needs detection to change signal groups. The following describes Vistro’s actuation methods:
- Fixed-time (pre-time) control consists of predetermined signal timing values not based on detection.
- Semi-actuated control contains some lanes with detection that influences signal operations. Often, the major-street thru lanes do not operate with detection to generate phase calls.
- Fully actuated control sets detection on all lanes that influences signal operations.
Control Types
Finally, before using Default Signalization to create signal groups, the Control Type for each movement should be reviewed under the Phasing & Timing section and set the following:
- Permissive (Permitted) control requires motorists to choose acceptable gaps and/or yield to conflicting vehicles or pedestrian traffic streams.
- Protected control assigns the right-of-way to turning drivers.
- Protected/permissive control has a protected signal group assigning right-of-way to turning drivers that then transitions to the permissive parent signal group, requiring turning vehicles to yield. Note: Permissive/protected control is modeled by selecting protected/permissive and changing the Lead/Lag setting to Lag.
- Split phasing control provides separation between signal groups within the same barrier and prohibits the signal groups from running concurrently.
- Overlap control is a controller output that combines two or more non-conflicting signal groups. This is mostly used to combine signal groups that sit in separate barriers. A common example is when a right-turn movement has an overlap phase running concurrently with the “shadowing” left-turn movement on the cross-street.
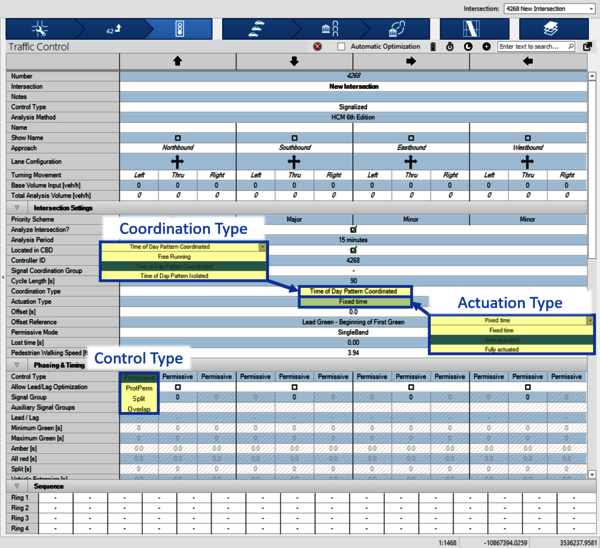
PTV Vistro traffic signal controller settings lets you update your Coordination and actuation method, as well as movement control types.
Default Signalization
After setting the primary controls and methods, PTV Vistro automatically sets up the traffic signal controller. Default signalization generates signal groups based on the control types. As a result, this will generate your Sequence and Phase Diagram for common 3 and 4-leg intersections. Also, Default Signalization will use the timing parameters defined in Global Settings. Furthermore, the Major and Minor street Priority Scheme determines how to allocate the NEMA traffic signal phasing convention. This is also customizable in Global Settings.
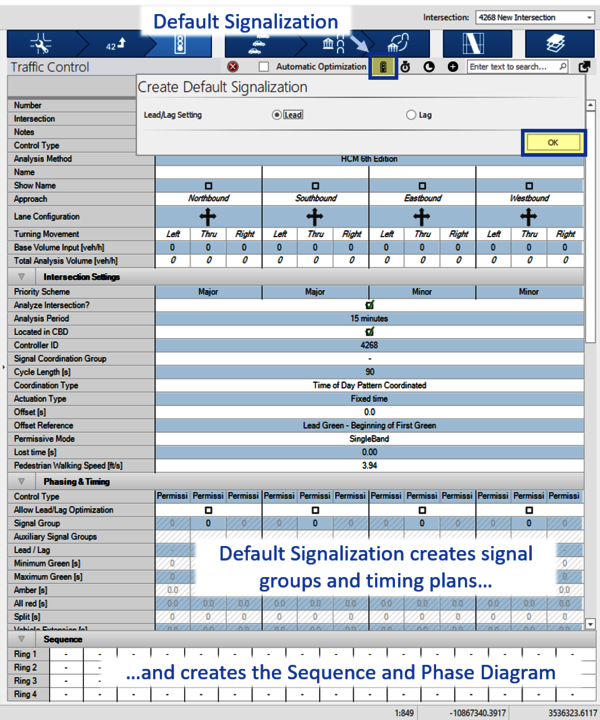
PTV Vistro's Default Signalization will optimize your traffic signal controller's signal timings and generate your ring-barrier sequence and phase diagram.
Moreover, Default Signalization optimizes the split and cycle length on the first setup run. This optimization considers the intersection’s lane configurations and total analysis volumes. Rerunning Default Signalization only optimizes the signal’s splits. Additionally, local traffic signal controller optimization settings are accessible under Signal Control -> Local Optimization. Here, the optimization's objective functions and lower and upper bounds settings are updated and saved. The ability to set Default Signalization for all intersections in one-click is available under Signal Control -> Default Signalization.
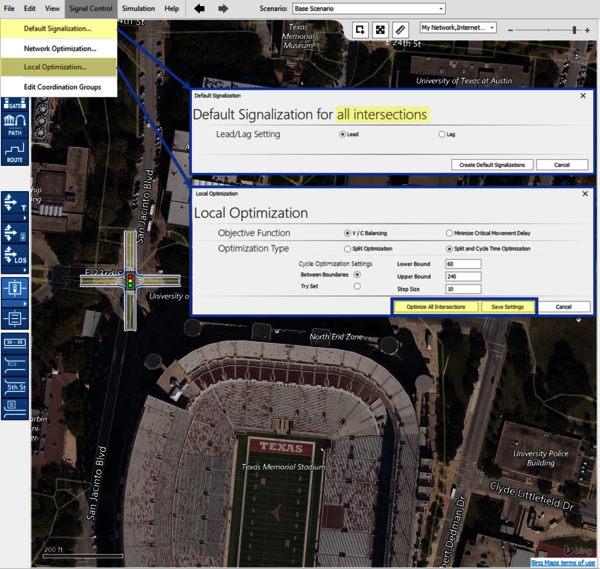
PTV Vistro's Local Optimization settings and Default Signalization of all intersections.
Flashing-don’t walk estimation
Furthermore, Default Signalization estimates pedestrian clearance or the flashing don’t walk (FDW) interval. First, the calculation uses the pedestrian walking speed entered in the Intersection Settings section of the Traffic Control workflow. These speeds are based on your agency’s recommendations and engineering judgment.
Next, if the Crosswalk Length is not set in the Intersection Setup workflow, PTV Vistro will automatically estimate the length using the roadway cross-sectional width. This feature is extremely useful for planning situations. A helpful warning message indicates missing crosswalk length values. Finally, FDW estimates and crosswalk lengths should be verified and replaced based on new lane configuration modifications, as-built designs, and/or field measurements.
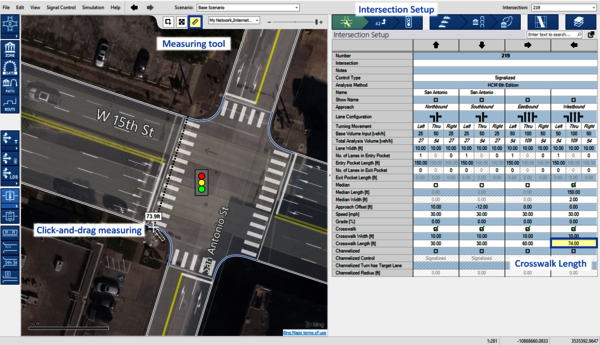
PTV Vistro's measuring tool can be used measure crosswalk lengths from Bing maps.
Modifying/customizing a traffic signal controller
The Phase & Timing section settings of the Traffic Control workflow are now accessible for updates after default signalization.
Critical elements to adjust are the Minimum and Maximum Green intervals and the Amber and All Red clearance intervals if different from the default values. A review of the pedestrian Walk and Clearance Intervals is recommended if crosswalks are present.
Details and recommendations on advanced settings like coordinated signal groups, minimum and maximum recalls, dual-entry, and detector settings are found in the PTV Vistro’s Help. Additionally, agency documentation like the NCHRP Report 812, Signal Timing Manual 2nd Edition provides guidance.
Ring-Barrier Sequence
Also, modification of the Sequence and Phase Diagrams is easy with PTV Vistro workflows. New signal groups are selectable with built-in drop-down lists showing unused signal groups. Furthermore, left-clicking on the vertical grid lines add additional barriers to the sequence. Vistro allows up to 4 rings and 8 barriers.
Phase Diagram
Clicking and dragging on the right end of a signal group's color bar updates the vehicle splits on the Phase diagram. Also, this works for the pedestrian signal group bars. The graphic parameter toggle in the network editor's left toolbar, Show Signal Groups, displays the signal groups per movement.
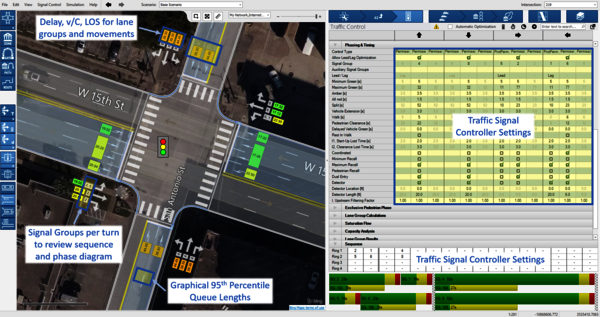
Settings and operations can be verified using PTV Vistro's graphic parameter toggles in the left toolbar.
Optimization
Lastly, traffic signal controller optimization can be achieved locally or applied over the network. Local optimization tools update the intersection cycle length and split, or just the splits. An array of tools are available on top of the Traffic Control workflow to optimize the selected intersection. The Signal Control -> Local Optimization dialogue optimizes all intersections locally. Information on network optimization is available in detail in this knowledge base article.

In PTV Vistro, an array of tools are available on top of the Traffic Control workflow to optimize the selected intersection.
